By following these simple guidelines, you can efficiently manage your Sender IDs and enjoy a smooth experience with our platform!
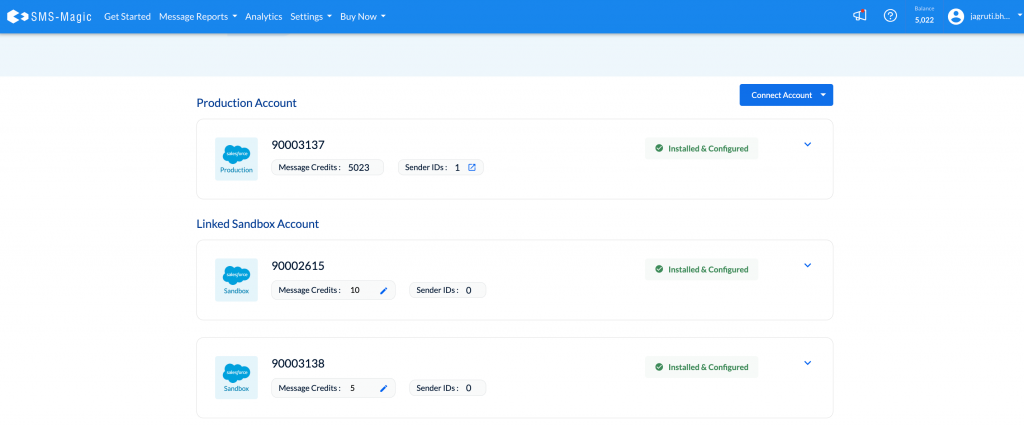
On the workspace page, you can easily view the total number of assigned Sender IDs for each account, helping you keep track of your Sender IDs.
You can purchase Sender IDs from the main production account and transfer them to a sandbox account based on the allowed limit.
However, it’s essential to keep at least one Sender ID in the production account before moving others to the sandbox for testing purposes.
Admins have the authority to transfer Sender IDs between connected accounts, giving them control over number management.
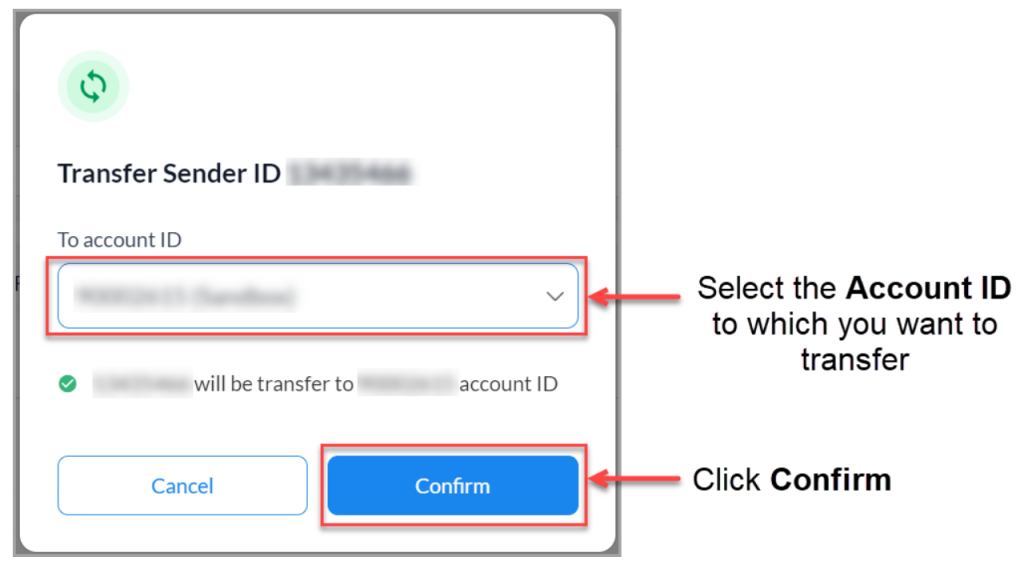
Additionally, users have the option to select the specific Account ID where they want to move a chosen Sender ID, adding flexibility to the process.
A Guide to Number Transfer
Now, with SMS-Magic Workspace, you can seamlessly move and manage your Sender IDs from the production account to the Sandbox account. You need to be on the Payee plan and not on the Trial plan to do so.
Here’s the procedure for transferring a Sender ID from a Production account to a Sandbox account in SMS-Magic Workspace:
Step 1: Verify Account Type
Before proceeding with the Sender ID transfer, ensure that you have a paid or licensed account as this operation cannot be performed with a Trial plan.
Step 2: Access Connected Salesforce Accounts
Login to Salesforce Org using your login credentials.
On the Workspace page – you can see the list of Connected Salesforce Accounts.
Step 3: View and Edit Sender IDs
Within the Connected Salesforce Accounts section, you will see the Sender IDs options for each account.
Review the current values of Sender IDs associated with your accounts.
To make changes to Sender IDs, click on the Link next to the Sender ID of your Production account. You need to have at least one Sender ID to transfer it from the Production account to the Sandbox account. This action will navigate you to the Settings tab.

Step 4: Transfer Sender ID
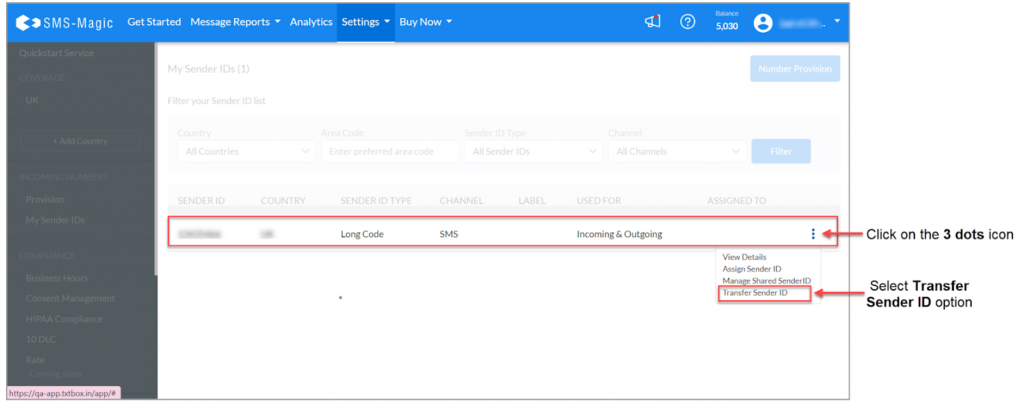
From the Settings tab, you will see a window with My Sender IDs.
From the available list of Sender IDs, select the one you wish to transfer.
Click the three dots (⋮) button associated with the selected Sender ID to access additional options.
From the options that appear, choose Transfer Sender ID. This action will trigger a dialog box to appear.

Step 5: Specify Transfer Details
In the dialog box, locate the Select Account ID drop-down menu and choose the Account ID of the Salesforce account to which you want to transfer the Sender ID.
After selecting the destination account, click the Confirm button to initiate the Sender ID transfer.

Step 6: Confirmation
You will receive a confirmation message once the Sender ID transfer is successful.
You have successfully transferred a Sender ID from a Production account to a Sandbox account in SMS-Magic Workspace. Ensure that you have chosen the correct destination account for the transfer to avoid any disruptions in your SMS messaging operations.

