
For sending automated messages from ZOHO Inventory
Firstly, you will need to create a webhook.
Then workflow rules to associate that webhook.
Create Webhook:
Go to Settings from the top right corner -> Automation ->New Workflow -> Webhook


2. Fill in the following details :
Workflow Rule Name: Give a name to the webhook
Module: Select the module from where you will be sending the message. Over here, we have selected Invoice.
Description: Give a small description of your workflow rule.
3. Choose when to Trigger :

You can choose when to trigger the workflow based on the parameters you select in the following fields.
Event-Based:
If the workflow is Event-Based, then the workflow is triggered when a module is:
Created
Edited
Created or Edited
Deleted
When a module is Edited or Created or Edited, additional fields appear.
Date Based:
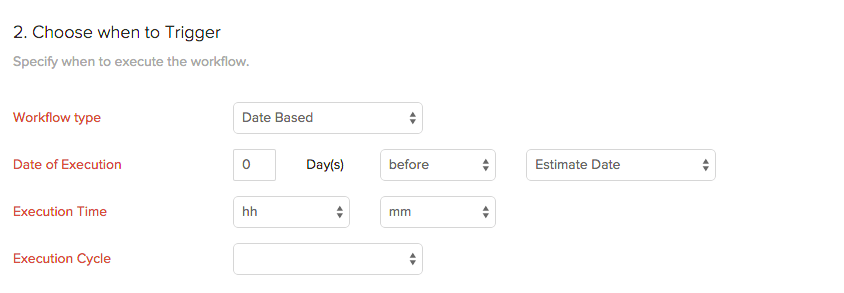
If the workflow is Date Based, additional fields appear.
Field | Description |
Date of Execution | Select the workflow to be triggered on any number of days before or after Module Date, Expiry Date, or Created Time from the drop-down.
|
Execution Time | You may choose the exact time of execution by selecting the corresponding hh or mm. |
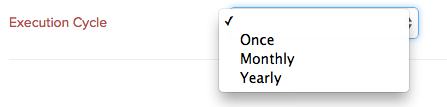
Execution Cycle | You may choose the frequency of triggering a workflow by choosing Once, Monthly, or Yearly from the drop down.
|

4. Filter the triggers
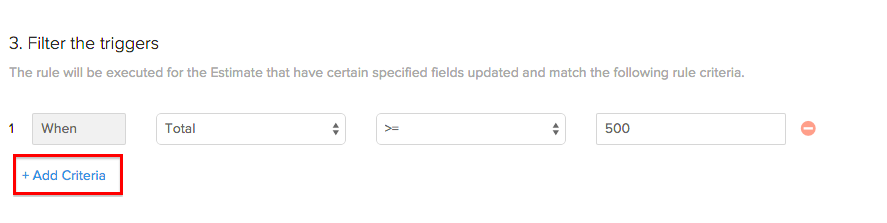
Filter the triggers section allows you to set one or more conditions based on which the action will be executed.
Field | Description |
Condition | The filter will be triggered based on the criteria you set. You can also add multiple criteria by clicking on + Add Criteria based on which the workflow rule will be executed.
The condition for the next criteria may be AND or OR depending on whether you wish to include both or either one of the criteria. Also, you can change the criteria pattern as you want by selecting Change Criteria. |
Field Attributes | The field is used to select an attribute from the list that broadly covers the terms that are related to the module. Image for reference below:
|
Rules | Select the rules based on which the system should filter the trigger. If the field has alphanumeric values, the rules are,
If the field has only numerical values, then the rules are,
|
Value Field | Enter the value of the attribute for which the filter must be applied. |


5. Trigger Type
There are two types of workflows:
Immediate
Timed Based

URL to notify: put the following URL in the field https://api.sms-magic.com/api/v2/message/send
Method: Select POST
Under Entity, Parameters select Append Selected Parameters

Checkbox the Add User-defined Parameter field and put text in the Parameter Name section

Paste the following XML in the Value Description section :

<m:Library xmlns:m="http://www.screen-magic.com" xmlns="http://www.defns.com"><username>info@allindiataxfiling.com</username><senderid> AITFTS</senderid><accountid>80016855</accountid><apikey>2bb0ac02eca864b5c6730e9f6f2f5d7c</apikey><message mobilenumber="${CONTACT.CONTACT_MOBILE_PHONE}" modulename="Invoices" recordId="${INVOICE.INVOICE_ID}">hi test</message></m:Library>
Note: The above XML is for the Invoice module, however, the XML needs to be modified accordingly for sending automated messages from other modules. |
Below is the description of parameters used in the XML.
<username> : username registered at our end
<senderid> : since these will be transactional messages therefore it will AITFTS the sender registered with the provider
<accountid> : SMS Magic account Id
<apikey> : you can copy the API key from SMS-Magic portal
(US Server: app.sms-magic.com)
(EU Server: eu.app.sms-magic.com)

<message>: SMS text that you want to use for sending a message. If you want to add merge fields like contact name, select module and the field. Take the cursor where you want to add the field and click on Insert Placeholder.

Record Id: record Id passed in the XML will differ with different modules. Over here, the message is getting triggered from the Invoice module, therefore, the record Id of the Invoice is passed. You can fetch the record id by selecting the module name and the record id and insert them in front of the record Id parameter.

Mobile number: Pass the field where the mobile number is stored. You can fetch the mobile number by selecting the module and the mobile field and pass the value in the mobile number parameter.
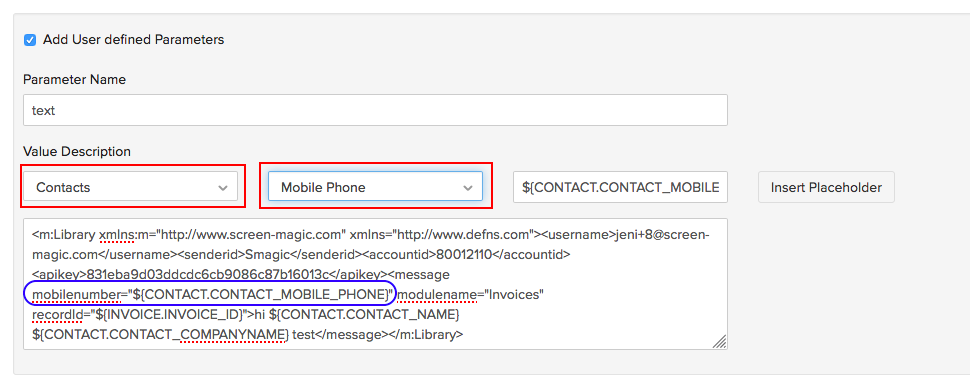
Module name : Lastly, pass the module name in the module name parameter.

3. Click on Save once all the details are filled in.
