
To set up SMS distribution connection:
Click the Setup icon in the user info widget.
Under the Portal Setup section, click the Apps and Services button.
Navigate to the list of Apps and Services to find the available SMS Distribution channels.
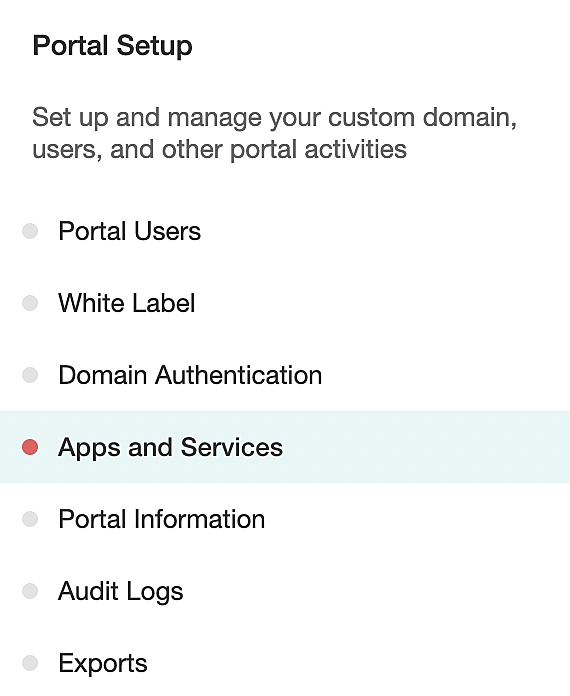
Click the Connect tab to integrate with SMS-Magic to send surveys through SMS.
In the Create Connection window, enter the name of the connection in the Name textbox.
Enter your Account SID in the Account SID textbox.
Enter the Auth token in the Auth Token textbox.
Enter the phone number or Sender ID of your connection in the Phone number/Sender ID textbox.
Click the Create icon to save the changes.

Note: You can create and add unlimited connections. You can send up to 1000 phone numbers in a single SMS invite.
To integrate with SMS Magic :
Click the Setup icon in the user info widget.
Under the Portal Setup section, click the Apps and Services tab.

Navigate to the list of Apps, and click the Connect button on the SMS Magic icon
In the Create Connection window, enter the name of the connection in the Name textbox.
Enter the Auth token in the Auth Token textbox.
Click the Create icon to create and save the account.
To manage a SMS distribution connection:
Click the Setup button in the user info widget.
Under the Portal Setup section, click the Apps and Services tab.
Navigate to the list of Apps and Services to find the available SMS Distribution channels.

Click the Manage button to view, add, edit, and delete connections.
To Add a Connection, click Add icon next to add a new connection. Add the necessary information and click Save.
To edit an existing connection, click the Edit icon next to an existing connection. Edit the necessary information and click the Save icon
To delete an existing connection, click the Delete icon next to an existing connection and click Yes to save the changes successfully.
Click Save to save the changes.
To set up SMS Distribution:
Go to the Launch tab.

Under Distribution in the left pane, click the SMS tab.

Click Create SMS icon.

In the Connection dropdown, choose the SMS account of your preference.
Click on the Import contacts icon.

To import contacts, upload CSV or XLS files or you can manually enter the contact detail of your respondents.

To import contacts from a CSV file :
Click on the CSV icon and select Choose file icon to upload a CSV file.
Enter the new group's name in the Name your new group text box and click Add icon.
To import contacts from an XLS file:
Click on the XLS icon and select Choose File to upload an XLS/XLSX/ODS file.
Enter the new group's name in the Enter the Name your new group text box and click Add icon.
To manually import contacts:
Click Manual and type or copy-paste contacts.
Enter the new group's name in the Enter the Name your new group text box and click Add icon.
To customize the SMS message:
Enter the SMS message that you want to send in the Message textbox. You can enter up to 150 characters.
Insert the survey link, next to {{SurveyLink}} followed by the text in the message box. A tiny URL will be automatically replaced while sending the message.
To insert variable text content, click on the Insert Variable dropdown and select the required variable from a list of variables.
Once done, you can save the message by clicking Save as a template or use an existing template by clicking Copy an existing template.
Click the Save icon to save the setup.
Click Send icon to proceed with sending the SMS.

To schedule SMS invitation:
You can now automate an SMS distribution invite or a reminder to be sent out at a time you decide.
Once you click Send, you'll be prompted to choose from the following options:
Immediately
At Scheduled Time
To send it at once, click SEND NOW.
To send it at a later point, click SCHEDULE.

Select Send on a Particular Date and Time and choose the date and time from their respective calendar, hours and minutes dropdowns to schedule the email to be sent once at a given time.
 Note:
Note:
- While scheduling a reminder for a scheduled invite, the day of start and time slot dropdowns are available.
- While scheduling a reminder for a sent invite, the date and time slot dropdowns are available.Select Send Periodically to send the email regularly over a period and set the frequency.
To choose the frequency of the email, click the Frequency dropdown.
To send the email every day, select Daily.
□ Choose the required Start Type for the email schedule start time.
□ Select the required Start Date and Time Slot.
□ Click on the Skip Weekends checkbox to skip sending the email on weekends.
To send the email every week, select Weekly.
□ Select the days to send the emails and the Time Slot(s).
To send the email every month, select Monthy.
□ Set the frequency
Select Daily to send the email on specific dates.
Select Weekly to send the email on the selected day of the selected weeks.
□ Select the required Time Slot(s).
To choose a custom interval, click on the Schedule Interval dropdown.
To choose an end type for the email schedule, click Schedule Expire. It can be set to be non-stop, based on a date, the schedule count, the collector response count, or the survey response count.
Once you're done, click Schedule.
Click Go back to go to the previous screen.
To schedule a reminder for an SMS you have sent:
Go to the Launch tab.
Under Distribution in the left pane, click SMS. You can only access this after you publish the survey.
Hover over the SMS invite you have sent in the Invite History section, then select Create Reminder.
Select a filter in the Send To field tab.
Make any necessary edits to the SMS Content, then click Schedule.
To edit a scheduled SMS invite:
Go to the Launch tab.
Under Distribution in the left pane, click SMS. You can only access this after you publish the survey.
Click the
 next to the invitation you want to edit from the list of scheduled invites.
Click Edit.
Make any necessary changes, then click Schedule.
To delete a scheduled invite:
Go to the Launch tab.
Under Distribution in the left pane, click SMS. You can only access this after you publish the survey.
Click the Delete next to the invitation you want to delete from the list of scheduled invites.
Click Yes in the confirmation dialogue box that follows.
To Track an SMS invitation:
Go to the Launch tab.
Under Distribution in the left pane, click SMS. You can access this only after you publish the survey.
Click Overview to see the following details:
Sent - Displays the details of how many SMS have been sent successfully.
Unsubscribed - Displays the details If someone has unsubscribed from your invite.
Failed - Display the details of how many SMS are not sent.
Invite History - Displays the date, respondents' details, and other details of each invite.
Click View for detailed information.
Click Create Reminder to send an SMS reminder to people who have not responded to your survey.
Click Recipients to see the following details:
Search Recipients - Search for a recipient by using keywords.
Phone Number- Displays phone numbers of the sms invitees.
Download as CSV - Download the list of filtered recipients in a CSV format.
Sent - Displays whether your invite has been sent.
Responded - Displays the response status of your survey.
If they have responded, click the View Response icon to view the responses you have received. This will take you to the reports section where you can see detailed response details.
To filter responses:
Go to the Launch tab.
Under Distribution in the left pane, click the SMS tab. You can access this only after you publish the survey.
Click the Recipients tab.
Click the Filter icon.
Select the desired filter from the drop-down list. You can view the collected responses under the selected filter.
You can filter your recipients based on various parameters.
All recipients - To view all the recipients
No responses - To view the recipients who haven't responded yet
Partial responses - To view the ones who have partially responded
Complete responses - To view the ones who have submitted complete responses
Disqualified responses - To view the recipients who don't fit your requirements
Over Quota Responses -To view the recipients who couldn't take the survey because it reached the limit of the preset quota.
Unsubscribed - To view those who have unsubscribed from your SMS.
Not sent - To view the SMS invites that have not been sent out yet.
Failed - To view the invites that have failed to send.
To search for a contact to find out if they have answered your survey:
Go to the Launch tab.
Under Distribution on the left pane, click the SMS tab. You can only access this after you publish the survey.
Click the Recipients icon and search for recipients in the search bar by using keywords.
To filter your SMS distribution contacts:
Go to the Launch tab.
Under Distribution in the left pane, click the SMS tab. You can access this only after you publish the survey.
Click the Recipients tab.
Click the Filter icon.
Select the desired filter from the drop-down list. You can view the contacts under the selected filter.
You can filter your SMS distribution contacts based on the following parameters :
All recipients - To view all the recipients
No responses - To view the recipients who haven't responded yet
Partial responses - To view the ones who have partially responded
Complete responses - To view the ones who have submitted complete responses
Disqualified responses - To view the recipients who don't fit your requirements
Over Quota Responses -To view the recipients who couldn't take the survey because it reached the limit of the preset quota.
Unsubscribed - To view those who have unsubscribed to your SMS.
Failed - To view the invites that have failed to send.

